Installation & Licence key
Connection
Execute LotAtc Client. After loading, a “Not connected” message will appear. Click on the [Connect] button of the main menu bar, you’ll get this:
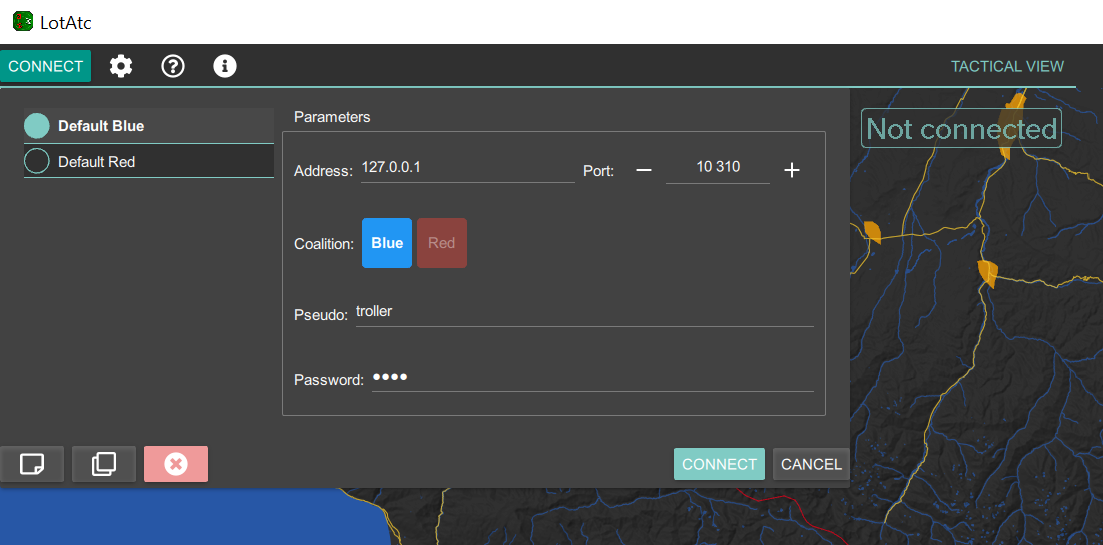
Enter the address (IP or URL/DNS) of the server you want to connect to, set the TCP port if using a non-default one (default port is 10310; LotAtc uses TCP only).
Choose your coalition by clicking on the blue or red square (active coalition is highlighted), then enter the password needed to access the chosen coalition (passwords are set by the server; ask the host what he set).
Default password are: “blue” for the blue coalition, and “red” for the red coalition. And yes, we won an imagination contest with that (a long time ago).
Finally, enter your Pseudonym (will be displayed when using the chat feature).
You can tick Auto-reconnect in the connection dialog. When enabled, LotAtc will reconnect on its own if the link to the server drops, using a progressive retry sequence. The setting is saved with your profile, so it persists across sessions.
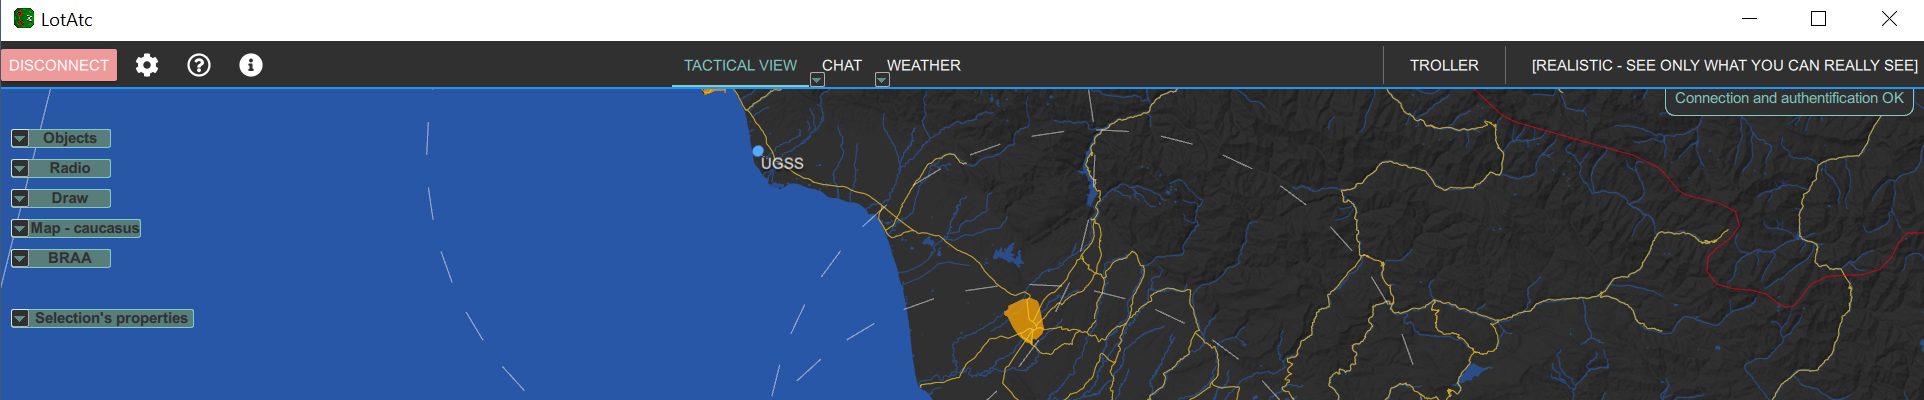
Then, click on the [Connect] button of the connection window. Once the connection is established, you will be notified by LotAtc displaying the following things:
- A non-persistent message saying “Connection and authentication OK” (top right of the radar display),
- Your pseudonym and the active detection profile at the top right of the main UI bar, and said bar will be lightly colored (the color of the pseudo and the bar depends on the coalition you’re connected to).
- The map is active (“bright” colors) and the geographical coordinates of the mouse cursor are dispayed in the bottom left corner of the radar screen.
Seconds later, if the DCS server is un-paused, the picture (tactical situation) and mission data should appear on your screen. Now, you’re an active controller: it’s time to work!
Remember that what you can see depends of the detection profile set by the server.
Using LotAtc client
Radar display
What does LotAtc show up?
Well, it displays, over a map (background), the units detected in the DCS mission. Which units are shown depends on the detection profile enforced by the server and, of course, the tactical situation at the time. The radar screen is refreshed every 2 seconds by default.
By default, friendly units (= from your coalition) are shown in white, and enemy coalition units are displayed in red. See below how to change that if you wish.
LotAtc is able to display:
-
Mission data, with: - current weather - time from DCS (smoothly interpolated client-side, so the clock ticks every second between server updates) - bullseye position (your coalition’s one only, of course) - geographical coordinates, position relative to the bullseye, and elevation of the point at the mouse cursor location.
NB: elevation requires the relief database installed; be sure to have checked Relief support for your maps during installation, you can install after also, see add/remove packages here
-
Aircraft units, with:
- a symbol that may vary depending on the detection profile enforced by the server, the nature or mission of the aircraft, or simply the controller’s choice (you or another colleague logged on the same coalition),
- a velocity vector showing where the aircraft is headed for; the lenght of the vector is either:
- showing where the aircraft will be in X seconds if it doesn’t change course nor speed
- or proportional to the aircraft ground speed measured by LotAtc,
- a customizable label with various data about the aircraft (see the labels page for more details).
-
Ground and Sea units, with:
- a SAM symbol for Ground units, or a ship symbol for Sea units,
- a label indicating their type, displayed only when you’re hovering your mouse cursor above the symbol.
-
Detection and Engagement circles, with:
- the detection circle (discontinuous line) that allows the ATC/GCI to assess units max detection range (AWACS, ground- and sea-based radars),
- the engagement (threat) circle (continuous line) that allows the ATC/GCI to assess units max engagement range (ground- and sea-based SAMs).
- You may hide those circles if needed to declutter your radar screen: See ‘Key shortcuts’ below.
Important:
Above ARCADE profile, the engagement (threat) circle is displayed only if the launcher is the same vehicule as the radar. LotAtc simulates an ESM capability, and you cannot know where precisely is a launcher if it doesn’t emit radar waves. Please refer to the detection profile page to learn more about what types of SAMs (and their circles) are displayed or not, and why.
In next picture, interface is described and we see a tactical view of the mission. All the units are white, which is the default color for friendly units (ennemies are red by default); this means here they all belong to our side (our coalition).
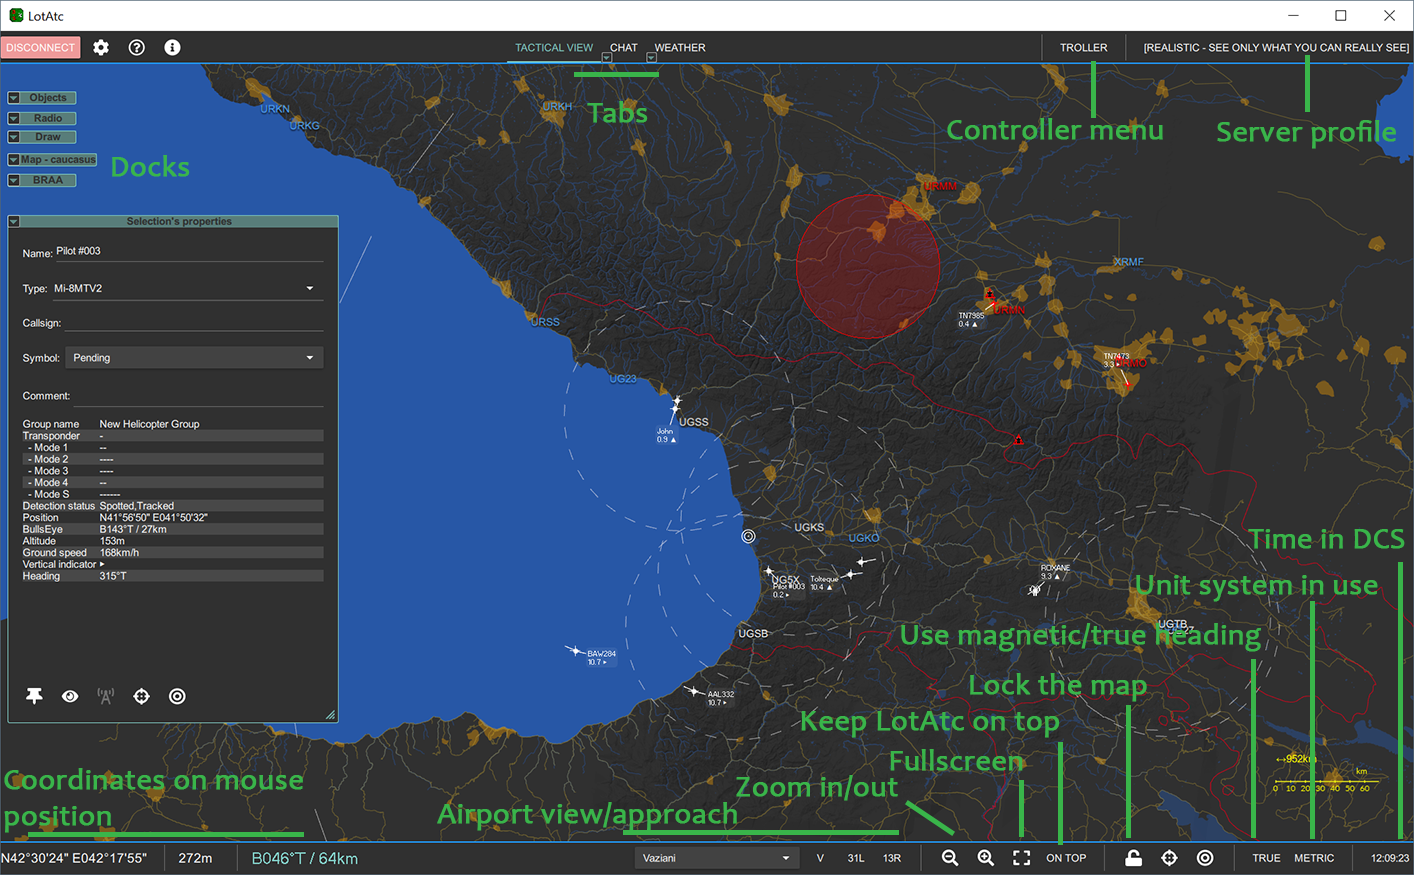
On this image, the green texts and arrows are legends. Those do not actually show up in LotAtc.
Mouse commands
Your mouse is your most used tool in LotAtc Client. Use it to:
- Move the map: Left click + drag
- Zoom the map: Mouse wheel
- Display an aircraft’s ‘detailled’ (hovered) label: Hover your mouse cursor over its label
- Display a ground or sea unit’s type label: Hover your mouse cursor over its label
- Rotate an aircraft label by 45° increments around its radar plot (to declutter the display):
- Maintain [Shift] and Left click on the label or the aircraft symbol for clockwise
- Maintain [Shift+Control] and Left click on the label or the aircraft symbol for anticlockwise
- Display and Set the properties (name, symbol) of a displayed unit: Left click on the unit then use the Properties panel on the right side of your display (this is not available in ARCADE profile)
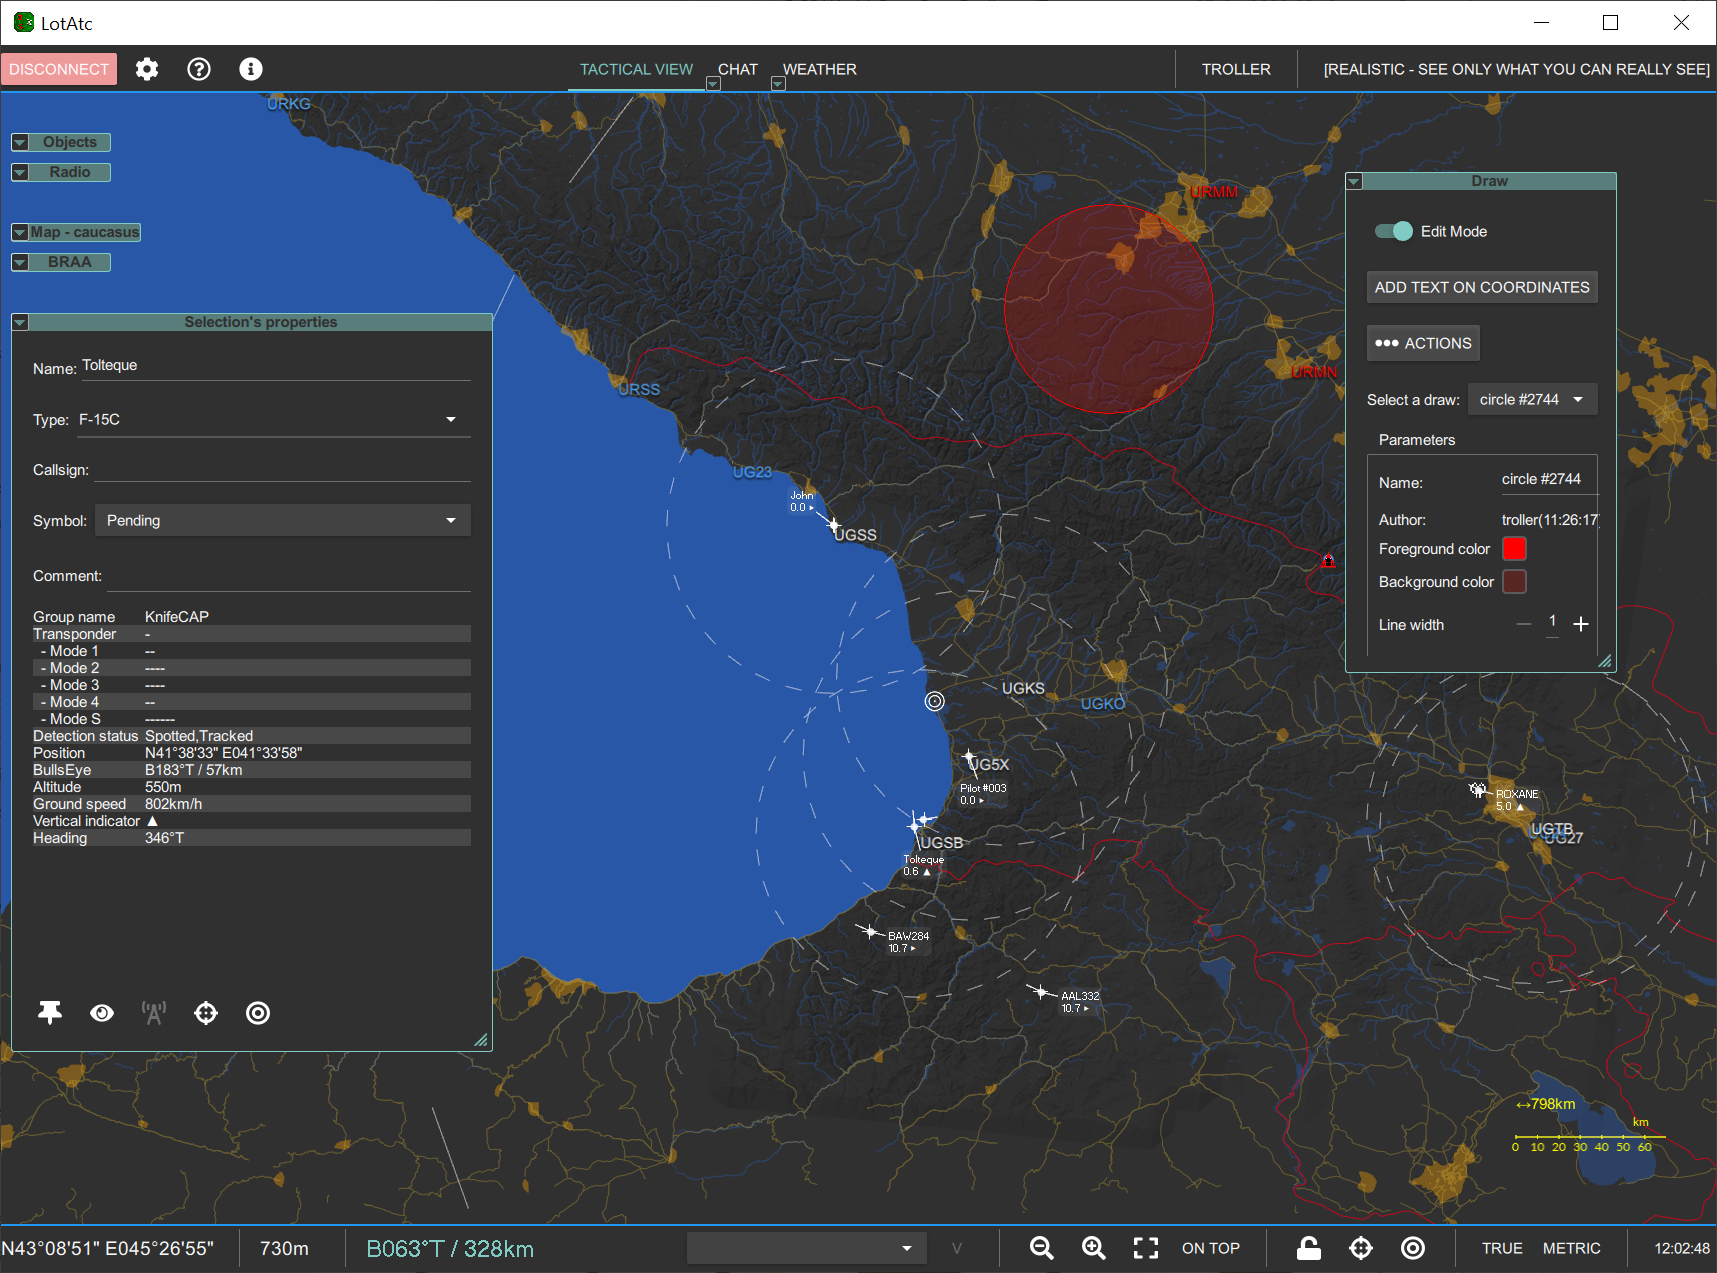
- Draw a bearing/range calculation line: Right click+drag
- Draw a persistent BRAA: Ctrl+right click
- Left click in mouse cursor data area (bottom left of map) to reduce it
About the latter feature, which is most useful for tactical controllers, here is how it looks:
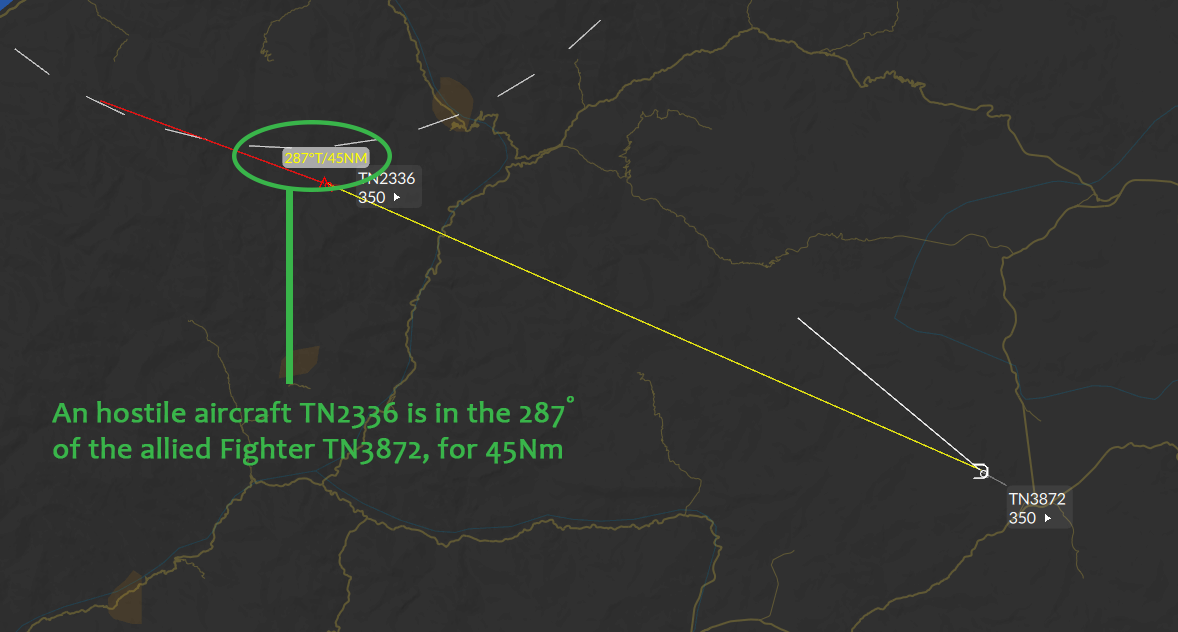
Again, on this image, the green texts and arrows are legends and do not actually show up in LotAtc.
Key shortcuts
Key shortcuts allow controllers to change some settings instantly, without having to dig into the option menu:
Global
| Shortcut | Description |
|---|---|
| Alt+B | Bulls on cursor |
| Alt+C | Show circle |
| Alt+D | Show range rings |
| Alt+F | Enter/Exit fullscreen |
| Alt+L | Show background label |
| Alt+N | Change unit |
| Alt+O | Reset map orientation |
| Alt+R | Use bullseye as reference for measure line |
| Alt+S | Snap to object/draw |
Tactical View
| Shortcut | Description |
|---|---|
| Left click | Move the map |
| Ctrl+Left click | Center the map on the cursor |
| Alt+Left click | Make a draw text item on the cursor (go in draw tab to modify it) |
| Right click | Measure line |
| Ctrl+Right click | BRAA line |
| Mouse wheel | Zoom/unzoom the map |
| Alt+E | Draw edition |
| Alt+G | Hide ground units |
| F2 | Set classification as hostile |
| F3 | Set classification as unknown |
| F4 | Set classification as friend |
| F5 | Set classification as neutral |
| Shift+F | Show/Hide all docks areas |
| Shift+F2 | Set classification as suspect |
| Shift+F4 | Set classification as assumed friend |
Only with LotAtc Advanced
More shortcuts.
Change the layout
See the docking page to know how to change the layout, move the panels and organize the interface like you want.
Options Menu
General (Languages)
This is where you’ll choose what language LotAtc Client should use. Restarting LotAtc is mandatory for any change made here to be applied.
Thanks to volunteer members of the community, several languages are now available for LotAtc Client. Thanks to all involved!
Please refer to the languages page for more details, including the list of available languages at this time.
Map
The map will be automatically choose by LotAtc client on mission start. You can force it in the map dock.
LotAtc supports currently the following theatres:
-
Caucasus
-
Nevada
-
Normandy
-
Persiangulf
-
Thechannel
-
Syria
-
Marianaislands
-
World
-
Falklands
-
Sinaimap
-
Kola
-
Afghanistan
-
Germanycw
LotAtc is built to allow more maps to be easily included and will support any new maps.
More on the maps.
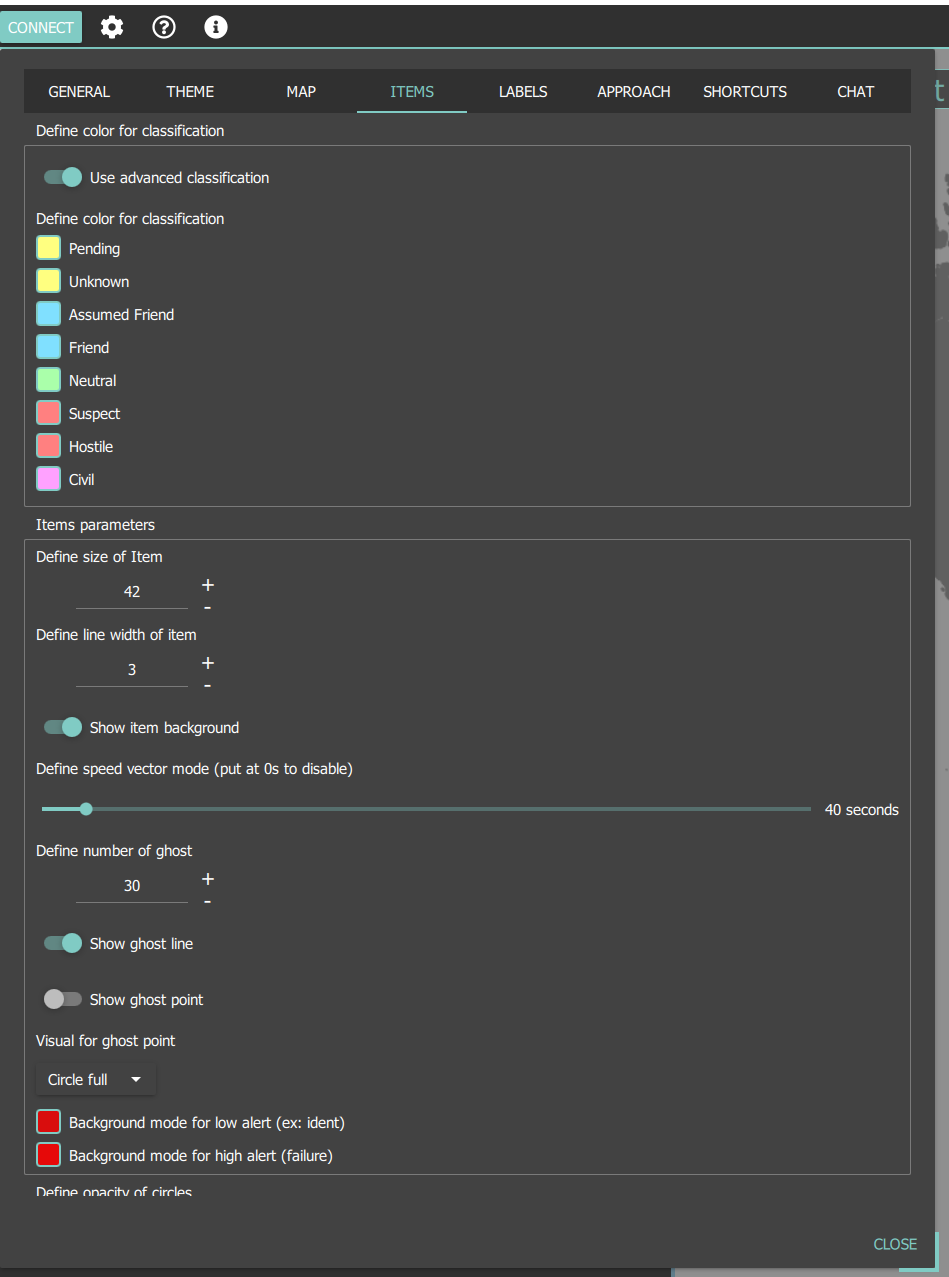
Items
The items option menu allows you to set LotAtc symbology principles.
Here you’ll be able to:
- set the colors you want to use for friendly and enemy units (defaults are: Friendly = White / Enemy = Red)
- set the size of the symbols (change it if symbols are too tiny to be read on your screen; default size is 15)
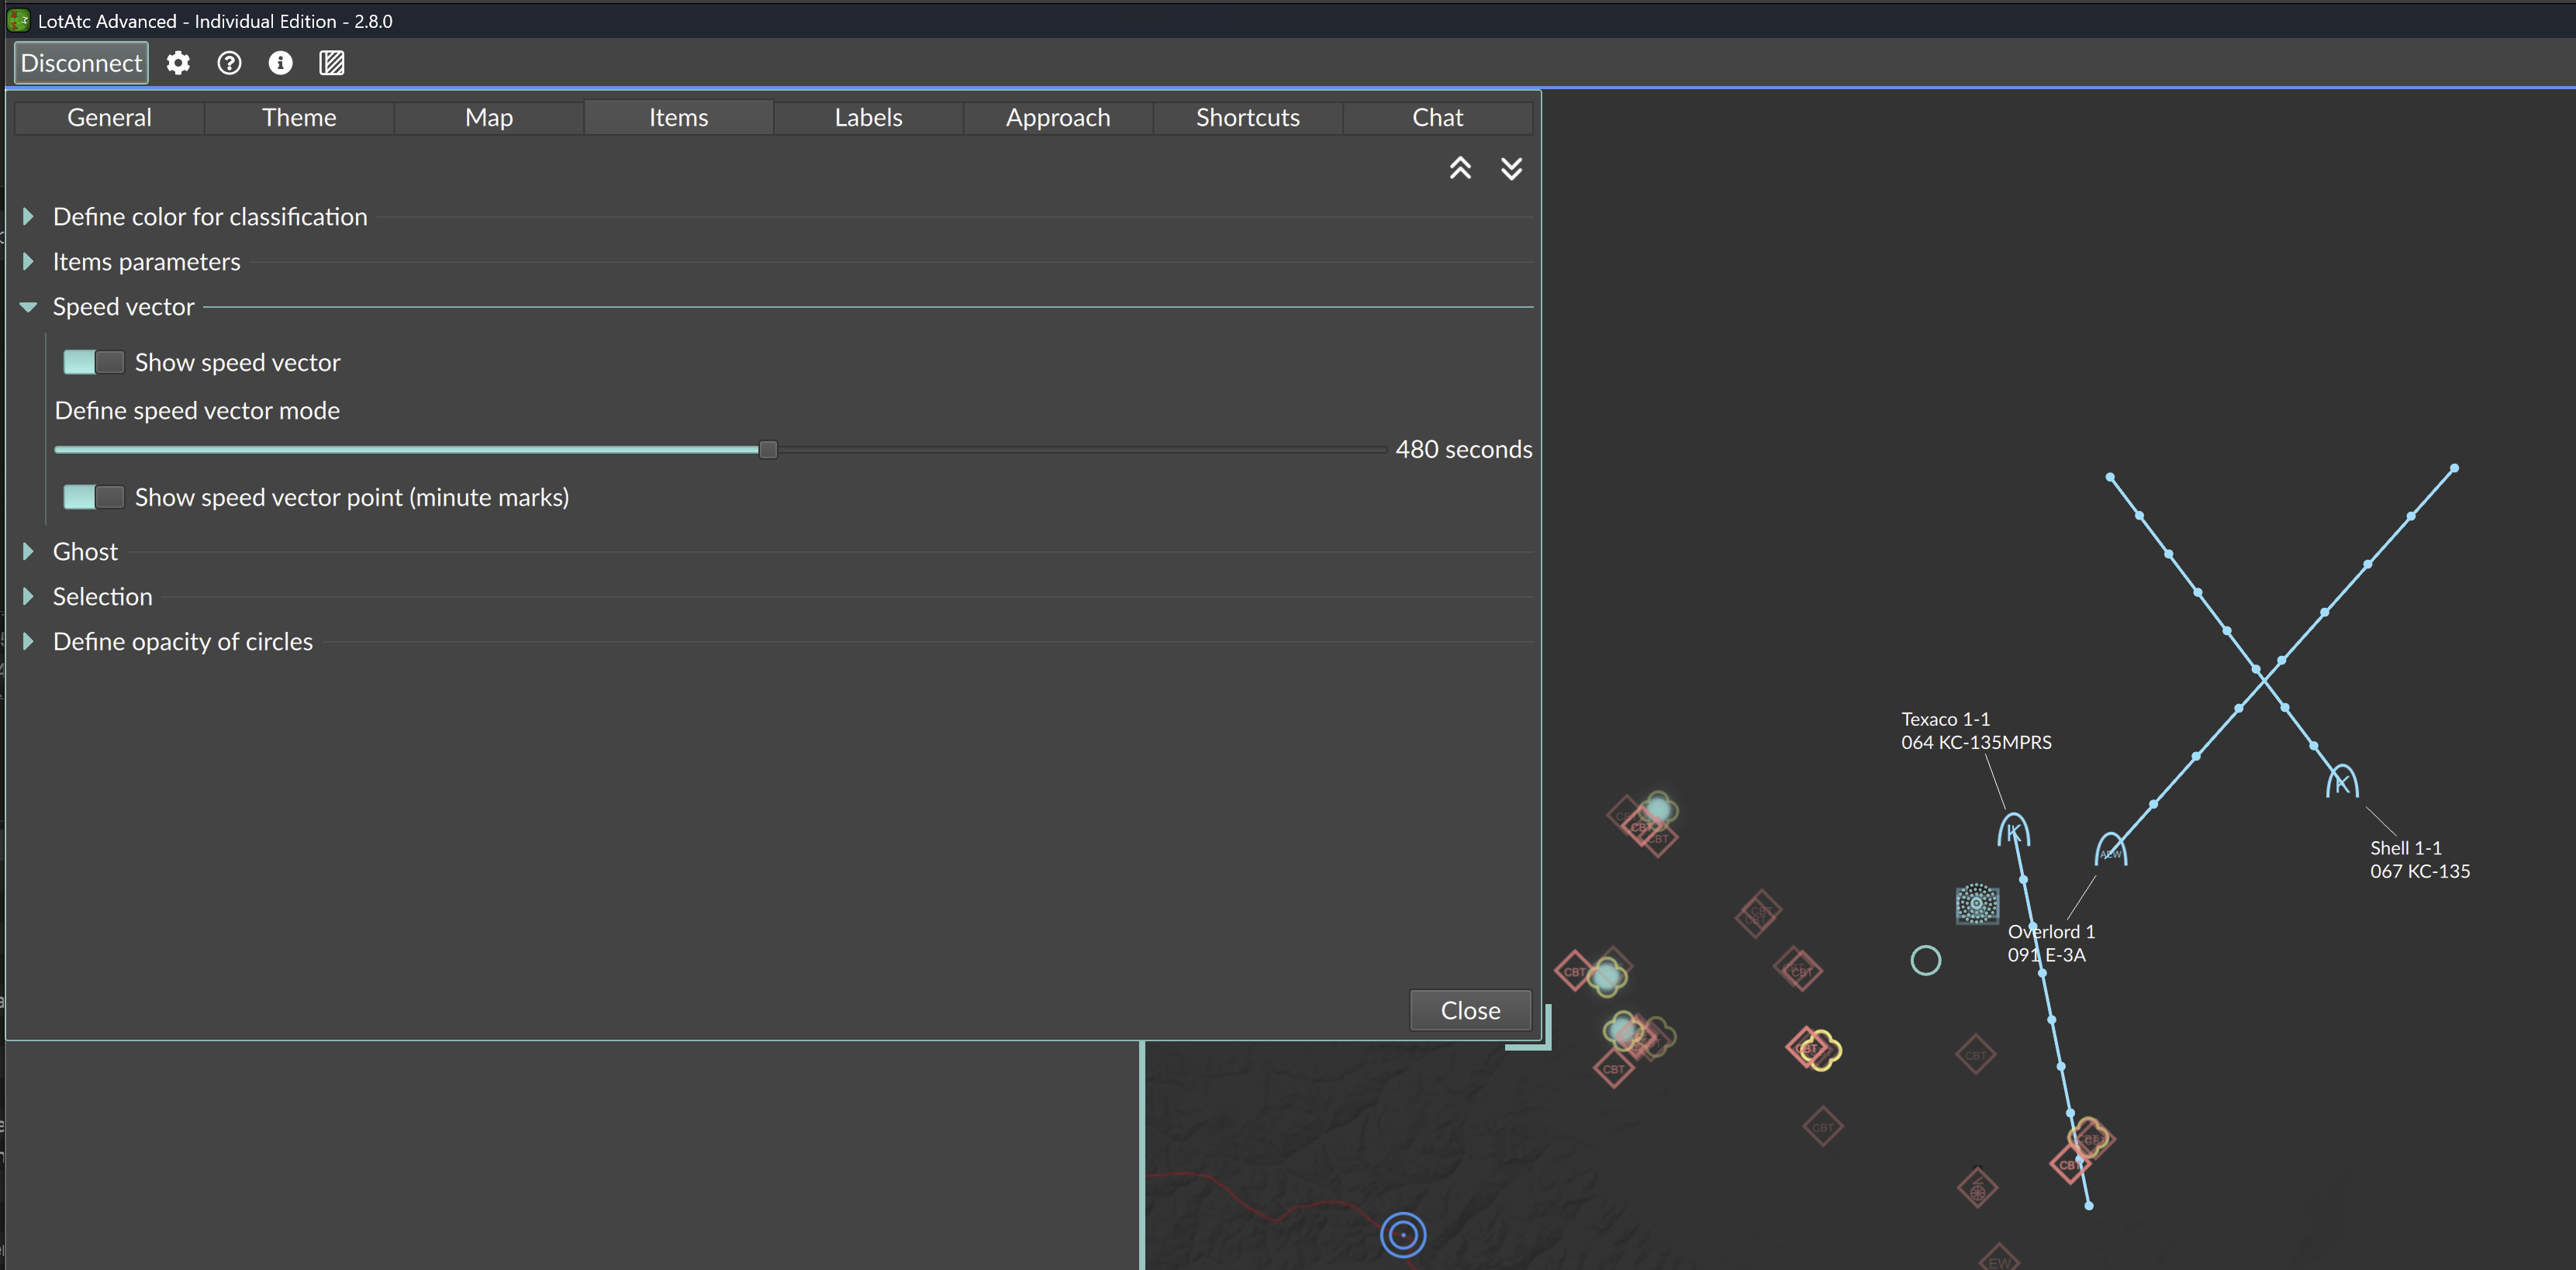
- configure how you want the aircraft speed vectors to be displayed between:
- the zoom independent mode (slider fully to the left), where the speed vector lenght is relative to the measured ground speed of the aircraft, and independent of the zoom of the map
- the time mode, where the far end of the speed vector shows where the aircraft will be in X seconds (set X with the slider); by nature, the speed vector lenght then varies depending on the zoom level.
- enable Show speed vector point (minute marks) to draw a tick on each speed vector at every minute, giving a quick read of the aircraft’s progress over time
A vector speed button is also available in the main toolbar so you can switch between the two modes (and adjust the time, when in time mode) without opening the options menu.
Labels
This option allows you to set what data the aircraft labels will display.
See the labels page for more details about this.
More
- Client Index - You will find all topics available for LotAtc client
- Client FAQ / Checklist / tips